HuskyCT How To

This page contains all of the major things you will need to know about the HuskyCT Learning Management System.

If you need help at any time please contact us by phone or email.

Phone:  (860) 486-5052        E-mail:  edtech@uconn.edu


HuskyCT Adding Content/Building Your Site

Basic build strategy for new “blank” course sites

A new HuskyCT site has some standard links in the left hand navigation menu. Announcements, Discussion Board and My Grades are all links to “Tools”. The "Course Content" area uses the Content Area type of page, which is the most versatile "all-purpose" type of page to build with in Blackboard. This is the only area immediately available in a new site where you can add files your students can access. The gray square indicates that page is currently empty.

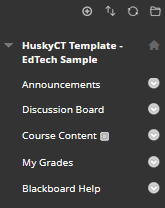
All types of files can be added – Word, PowerPoint, and PDF. The most user friendly for your students, however, will be PDF files set to open in a new window. Content Areas are also used to add online Assignments and Tests. Many more Content Areas as well as other Tool links can be added to the navigation menu. It is also possible to link directly to a web site from the menu.

Checklist for preparing HuskyCT sites with restored content

  1. Remove any files, web links, tests, assignments, or forums that you do not plan to use
  2. Remove the old syllabus file and add the new one
  3. Hide links to content and activities that you do not want the students to see as soon as they get access to the site.
  4. Add new availability dates and due dates to Assignments, Tests, and Graded Discussion Forums
  5. Check web links to see if they are still active. Delete or edit as needed.
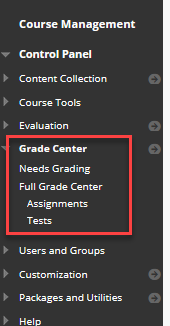
  6. Check the Grade Center for columns you will no longer be using and delete them.
  7. Go to “Manage”, then “Column Organization” to view columns currently hidden from you in the Grade Center. Unhide columns that are no longer relevant and then delete them.
  8. Disable the “Total” External Grade Column
  9. Be sure Grade Center columns are “Hidden to Users” if you do not want students to see them in “My Grades”
  10. Use “Edit Mode OFF” to determine what content and links are visible to the students. The true student view is not functional until the site becomes active for the real students.

Basic build strategy migrated course sites

Some instructors request to have the content of old HuskyCT sites copied into new HuskyCT sites for the upcoming semester. If the content copied over is coming from the older version of HuskyCT (Vista), there will be many links in the left-hand navigation area.

Often these links are to tools that were never used in the old system and should be deleted. Some of the links have the names of tools in the old system, such as Assignments or Assessments, but in the new system, these links are for Content Areas that have the assignments or assessments posted on them.

Watch this video for an overview of basic building options and strategies in HuskyCT:

Course Settings

Customizing Course Settings

Under the Control Panel inside a HuskyCT course site, there is a "Customization” link. In this menu are “Properties” and “Teaching Style“.  customization menu

The availability dates for the course site can be changed under Properties. Since the default start date for student access to HuskyCT sites is the first day of classes, some instructors choose to open up the site earlier by changing the start date under Properties.

The Teaching Style option is most often used to adjust the entry page for the HuskyCT site. In new “blank” course sites, the entry page is the Announcements page. In sites migrated from the old HuskyCT system, the entry page is often the old “Course Content” page. A nice feature of our new system is the ability to choose which link in the left-hand navigation menu will be the first thing that students see when they access the site.

HuskyCT Announcements, Messages, Email

Announcements

This is one of the most frequently used tools in HuskyCT. When instructors create an announcement, it gets posted in the HuskyCT site, a notice appears under the course title in the “My HuskyCT Classes” box, and an email notification is sent to each student using the email address associated with their profile in the HuskyCT system.

Messages

The “Course Messages” tool is an internal email system. Instructors must add this tool to the left-hand navigation menu to make it available to students. Then, students or the instructor can send messages to others enrolled on the HuskyCT site. Those users must come into the HuskyCT course site to send message or check their Inbox for messages sent to them.

There is no connection between this email tool and the uconn.edu mail accounts.

Email

This email tool enables the instructor to send emails to individuals or groups in a particular HuskyCT course site. These emails go to the recipients’ uconn.edu email addresses, unless they have edited their profile and entered a different external email address.

No record of these email communications send by the instructor is available within HuskyCT. The instructor will receive a copy of the email in their own uconn.edu email account, however.If students respond to emails sent using this tool, those replies will go to the instructor’s uconn.edu email address.

This tool can be added to the navigation menu for use by the students, but its use can be limited to the instructor. For this, the instructor should access the “Send Email” tool under the “Course Tools” menu in the Control Panel in the left-hand navigation menu.

Giving Quizzes and Exams (Tests, Surveys, Pools and Respondus)

Tests

Instructors can create online tests using HuskyCT. There are 17 different question types that can be used, all but 2 of which will be graded automatically.

The “Test Options” that can be applied include number of attempts, time allotted to take the test, the time period when the test will be available to take, and the extent of the information that students see after taking the test.

It is also possible to set up “Test Availability Exceptions” which make it easy to have one test but allow an extended period of time to a student who qualify for this accommodation.

Test questions can be delivered in random order, question answer order for multiple choice questions can be randomized, and it is even possible to have questions drawn from sets so that students are not all getting the same questions.

Test results for the whole class can be downloaded by the instructor into a spreadsheet and various types of statistics are available.

Tests can be exported from one HuskyCT site and imported into another.

Delivering tests through HuskyCT is not difficult, but it requires several steps and a good understanding of the test settings. There are also some best practices that students should follow in order to minimize the possibility of encountering problems saving answers or submitting tests. Consequently, we encourage instructors to work with Educational Technology when getting ready to use this tool.

Surveys

Surveys can use the same question types as Tests but surveys are not scored and the student providing a particular set of answers is not identified. The instructor will know, however, which students completed the survey.

Survey results can be downloaded into a spreadsheet and statistics are available which provide information on how many students answering a question chose a particular response.

Please note: while the survey results are considered anonymous, in the case of only 1 respondent, the individual’s identity would be known. Depending on the information being gathered and how that information is going to be used, instructors may need to utilize a tool outside of HuskyCT. UConn has the web-based software, “Qualtrics”, available for creating and administering surveys.  Please visit the OIRE (Office of Institutional Research and Effectiveness) website to get more information and access the Qualtrics tool.

Pools

Pools are a means of organizing test questions in HuskyCT. Having questions in pools makes it much easier to find and re-use those questions when creating tests. Question pools can be exported from one HuskyCT site and imported into another.

If instructors are creating their test questions directly in HuskyCT and wish to have them organized into pools, they should create a new Pool, then add questions there, instead of creating them directly in a Test.

Respondus

Respondus is a Windows only application that can be used to create tests or pools of questions that can be published directly to a HuskyCT site. It can also be used to create multiple versions of a printed test.

One of the key advantages of Respondus, however, is the ability to import questions from a Word or text file. Once the questions are imported to a Respondus file, they can be quickly and easily published to a HuskyCT site. This can greatly reduce the amount of time it takes to create a Test in HuskyCT.

Respondus can also be used to extract questions from a HuskyCT Test or Pool. This can be helpful when a Test was created inside HuskyCT, but the instructor wants to be able to have a local copy of the test or be able to print out the Test.

UConn currently has a site license for Respondus 4.0 so it can be downloaded for free by all instructors and staff. Please visit the website for the Software Licensing Group to download the software and the installation code. Go to the Respondus information page and look under the “Distribution” heading.

Lockdown Browser

LockDown Browser is a custom browser that locks down the testing environment when used for taking a test in HuskyCT. When taking a test using LockDown Browser, students are unable to print, copy, go to other websites, access other applications, or close a test until it is submitted for grading. LockDown Browser can be a good option for in-person quizzes/exams, where students are expected to bring their own devices and take a quiz/exam through HuskyCT, but the instructor wants to add a layer of security to prevent students from using their devices for anything other than the quiz/exam itself.

Monitor is an additional feature that uses a student's webcam to record them taking an online, non-live-proctored exam. When this feature is enabled for a test, students are required to use a webcam and microphone with LockDown Browser. After the exam is complete, an instructor can review details of the assessment, including the recordings of their students taking exams.

Instructor Live Proctoring (new for Fall 2021) allows a video conference to run in the background during an online exam that uses LockDown Browser. This option is for live, synchronous proctoring by the instructor, and is ONLY recommended for small class sizes (25 or less) where it is possible to observe and track all students during a video conference. (Note: This isn't recommended for iPad-enabled exams unless the student has a second device for video conferencing. LockDown Browser Live Proctoring does not currently work with Webex. Teams and Collaborate are the recommended web conferencing platforms for use with Live Proctoring.) Unlike Monitor, Live Proctoring does not automatically make a recording of student video and audio feeds. If an instructor wants a recording of the quiz/test, they would need to turn on the recording for the web conference platform they are using.

Instructors can require use of LockDown Browser with either Monitor or Live Proctoring (Monitor and Live Proctoring cannot both run at the same time).  Additionally, while LockDown Browser can be used on its own without Monitor or Live Proctoring, both Monitor and Live Proctoring depend on also using LockDown Browser. In other words, Monitor and Live Proctoring are not independent of LockDown Browser.

Instructors can require use of the above features when having students take a test in HuskyCT. These settings are applied to each test individually. This is done by clicking on Respondus LockDown Browser under Course Tools in the Control Panel of your HuskyCT site.

Once LockDown Browser is required for a test, students can only take the test using LockDown Browser. No other browser option (such as Chrome, Firefox, Safari, etc.) will be accepted. Consequently, students need to take the test using a computer that has LockDown Browser installed. If students will be using their personal computers, they are responsible for downloading the LockDown Browser software from the "Useful Links for Students" area on their HuskyCT Institution Page and installing it on their computer. It can be used on both Macs and Windows PCs, as well as Chromebooks and iPads. (Allowing iPads does require enabling a setting under "Advanced Settings.") When the Monitor feature is chosen as an additional part of a LockDown exam, students must go through some set-up steps prior to beginning a test/exam to agree to the process and make sure it is working correctly.

Watch this video on the basics of LockDown Browser:

For further details and step-by-step instructions, please visit the Instructor Guide for LockDown Browser.

Assignments and SafeAssignments

Assignments

Instructors can provide the ability for students to submit work online by creating an Assignment. An Assignment can be added to a Content Area or Content Folder or to a Learning Module. This is done using the “Assessments” button at the top of these different content posting options.

Instructors set the dates when the Assignment link will be active, a Due Date, the number of attempts allowed, and the points possible. Students click on the Assignment link to access the screen where they have the option to browse for and submit a file.

Instructors access the submitted assignments through the Grade Center. It is possible to mark up the submitted assignments online and enter the grade and comments on the same screen.

SafeAssignments

The SafeAssign function is now a setting in “regular” assignments. Instructors can create a SafeAssignment by selecting the option “Check submissions for plagiarism using SafeAssign” under “Submission Details” when creating an Assignment. Instructors also decide whether students see the “Originality Report” or not.

When an assignment is designated as a SafeAssignment, the student work submitted will be checked against various databases and the Internet for matching text (see Blackboard’s help page for more information). An “Originality Report” is generated which indicates the total percent match between the student’s submission and the sources checked during the review process. Each instance of matching text will be highlighted and the source indicated.

Since SafeAssignments are now just Assignments with an added feature, the help files listed in the right-hand column for grading and downloading assignments apply, as do the instructions for ignoring, clearing or allowing an additional attempt.

Discussion Board

Discussion Board Access

Instructors need to provide access to the Discussion Board by adding a tool link in the navigation menu. Once the board is active, the instructor creates “Forums” within the board and students post to those forums.

Forums

Multiple forums can be created in a Discussion Board.  These will be the areas there students post.

Forums in the main Discussion Board for the course will be accessible to all students enrolled on the course unless the instructor blocks users from a particular forum.

If Groups have been created, it is possible to activate a Discussion Board for each group and create forums there that will only be accessible to that group’s members.

Threads

To start a thread, students click on the “Create Thread” button. Students also have the option to reply to an existing post, which adds to the “thread”. Students have a text editor to use for their posts, but only one file attachment is allowed using the “Attach file” option.

Discussion Forum Settings

  • they can be graded or ungraded
  • attachments can be allowed or not
  • they can have a limited display period
  • anonymous posts can be allowed,
  • students can be allowed to edit or delete their own posts
  • students may be required to post before seeing posts created by others
  • students can be limited to only responding to other posts and not creating new threads (this is rarely used)
Rubrics

Instructors can create “Rubrics”, or grading matrices, in HuskyCT which can be used for grading Assignments, Discussions, Blogs, Journals, and Wikis. It is also possible to associate a Rubric with a Grade Center column. Rubrics can be created with no points associated with level of performance in a certain area, set points, point ranges, percents or a percent range.

The initial “Rubric Grid”, or template, consists of 3 rows for the criteria being evaluated and 3 columns for different levels of achievement. The number of rows and columns can be edited and text can be placed in each cell of the rubric which describes that level of performance for a particular area being assessed.

Rubrics can be exported from one HuskyCT site and imported into another.rubrics

Associated Help Files

Using Rubrics (Blackboard help file)

What are rubrics? (website at DePaul University with information about using rubrics. Examples are included)

Grade Center

About the Grade Center

Each HuskyCT site that is created has a Grade Center. Only those enrolled on the site in the role of “Student” will be listed in the Grade Center.

The Grade Center is accessed from the Control Panel under “Course Management”. Click on “Grade Center” and then “Full Grade Center”.

Default columns

The columns created by default include Last Name, First Name, Username (NetID), Student ID (PeopleSoft ID), Last Access, Availability, Weighted Total and Total. Instructors often choose to hide the Student ID and the Availability columns.

If it is not going to be used, the Weighted Total column can be deleted. The Total column, however, is an “External Grade” column as indicated by the green check mark. This cannot be deleted but it can be “disabled”. This is HIGHLY RECOMMENDED as this column is set up to start adding all values in the Grade Center and display that to the students. This has resulted in many problems for instructors. Please see the help file at the right for disabling the default Total column.

Creating additional columns for manual data entry

Instructors can create additional columns in the Grade Center and use these to record grades from in class exams or quizzes, for papers handed in, homework grades, participation grades, etc.

Creating columns which perform calculations

Calculated columns can be created which compute the sum or average of the scores in group of columns, apply weightings to grades and add them together, or to identify a maximum or minimum value. It is also possible to drop 1 or more of the lowest grades from a set before the calculation is made. This is accomplished by selecting a “Category” of columns when choosing columns to include in the calculation.

Columns created automatically by graded activities in HuskyCT

When an instructor creates an online Test, Assignment, or SafeAssignment in HuskyCT, a column is created automatically for the grades generated by those activities. The same is true for graded Discussion Forums, Blogs, Journals, and Wikis. Therefore, columns should not be created manually for inputting the grades for these activities. This will result in duplicate columns and considerable confusion for both instructor and students.

Allowing students to view their grades from the Grade Center

Instructors can release grade column information to students which they view using the “My Grades” tool. Each student will only see their grade from a column that has been set to “Show to users”.

Sending grades from HuskyCT to Student Admin (PeopleSoft)

While the HuskyCT Grade Center is often used as a working "gradebook" for academic courses, it is not the system of record for official grades at UConn. Only grades in a course's grade roster in Student Admin are considered official and will appear on students' transcripts. As such, grades from HuskyCT will not automatically appear in Grade Rosters in Student Admin. If an instructor is using their course's Grade Center and would like to send a grade column from HuskyCT to their grade roster in Student Admin, the Grade Center has a built-in feature for that called "Grade Column Approval and Transfer." Detailed instructions on this process can be found here.

Typically instructors will choose to use this feature to report midterm and final grades, and the process is basically the same for both. (The only difference is that the name of the columns sent need to begin with "Mid" for midterm grades or "Fin" for final grades.) Other than that, the column just needs to show a letter grade value as the column's "Primary Display" and be set as the External Grade. All instructions and details are covered on the "Sending Grade from HuskyCT to Student Admin" page.

While many instructors set up their Grade Centers to record and calculate grades using one or more "Calculated Columns" in the Grade Center, all that is really needed to send a grade from the HuskyCT Grade Center to Student Admin is to have one column that represents the grade that should be sent, name it so that it begins with "Mid" or "Fin" as appropriate, set the Primary Display to a letter grade, and set the column as the "External Grade." In other words, the column does not necessarily need to be a calculated column; an instructor could just create a single column and enter letter grades into it without the column itself doing any calculations.

Watch this video on sending your grades from your HuskyCT Grade Center to your Student Admin Grade Roster:

Common Issues

  • Not knowing the difference between “Hide” column and “Hide from users”
  • Not disabling the default “External Grade” Total column
  • Needing to change browsers to manually enter grades
  • Not knowing that Upload and Download options are under “Work Offline”
  • No scroll bar appearing for Mac users
  • Not knowing how to upload grades into existing columns
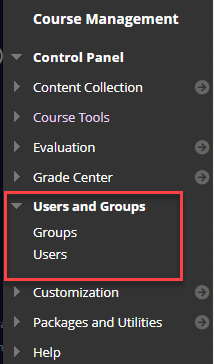
Users and Groups

Users

The list of Users includes all members enrolled on the HuskyCT site, regardless of their role. In all HuskyCT sites you should see those in the Instructor role listed here as well as those in the Student role. In some sites, there may also be those in the Teaching Assistant role, Grader role, or Builder role. Each role has specific “privileges” assigned to it.

users and groups menu

Instructors are able to build their site, manage the Grade Center, and manage members. Teaching Assistants can do almost everything that those in the Instructor role can do except for adding or removing members. Graders can access the Grade Center and grade submitted Tests, Assignments, and Discussions, but they cannot add or remove content from the site or build Tests or Assignments. Builders cannot access any student data, but have the ability to modify the content and organization of the site.

Instructors and students listed in PeopleSoft for a certain class will automatically be enrolled on the HuskyCT site created for that class. If needed, however, those in the Instructor role can

enroll additional users. This option is used most often to enroll TAs, but anyone with a UConn NetID can be enrolled manually on any HuskyCT site in any role (Instructor, Teaching Assistant, Grader, Builder, Student). Please note, however, that Instructors in a HuskyCT site do not have the ability to un-enroll other Instructors on the site. For this, the Instructional Resource Center should be contacted.

Groups

Groups can be formed within a HuskyCT site in a few different ways. Multiple groups can be created at once using the “Create Group Set” option. The instructor can choose to enroll group members manually, have students randomly assigned to the groups, or have students “Self-enroll” into the groups which is accomplished using sign-up sheets. Groups can also be created one at a time with the option to manually enroll students or to have students Self-enroll.

When creating groups, instructors must name the group(s) as well as choose which tools should be made available for the students to use within their group. By default, all the Tool options are selected, so instructors will want to un-check all those they wish to remove. The tools most often left active are Discussion Board, Email, and File Exchange.

Once Groups have been created, instructors can create Assignments that are designated “Group Assignments”. This means that one submission only will be accepted from the group and the grade given to that assignment will go into the Grade Center for each student in the group.

Groups can also be used for “Adaptive Release”. This makes it possible for the instructor to post content or an activity that can only be seen by members of a certain group. Sometimes this function is used in HuskyCT sites where the honors section for a course has been combined with the regular section.

Students will gain access to their group area and the tools that are active using a new link that will appear in the left-hand navigation menu called My Groups.

Instructors need not add themselves as group members as they will be able to access all the group’s work from the Groups Tool under the Control Panel.

Student Resources for HuskyCT

This page contains links to HuskyCT resources for students.

If students have questions about any of the tasks covered in these tutorials and help pages, they should contact the UITS Technology Support Center at techsupport@uconn.edu or (860) 486-4357. Outside of normal business hours and on holidays, students can contact Blackboard’s 24 x 7 help desk at http://huskyct24x7.uconn.edu

Assignments/SafeAssignments

Submitting an assignment

Submitting a SafeAssignment

Viewing Graded Assignments or SafeAssignments

Journals and Discussion Board

Using the Discussion Board
Viewing other students journal posts
(public journals only)

Groups

Working in groups

My Grades

Viewing Grades

Tests

Taking a test

Associated Help Files

What are rubrics? (website at DePaul University with information about using rubrics. Examples are included)

Student View

Edit Mode OFF Student View

When working in a HuskyCT site, an instructor needs to be in “Edit Mode ON”. By changing Edit Mode to OFF, an instructor will not see links to files, assignments, tests, discussion forums, etc., that are not currently available to students, but they will still see the Control Panel area of the left-hand navigation menu, so it is not a “true” student view.”

Student Preview Mode” – a true student view

Accessing Student PreView mode: Use the “Student Preview mode”  button at the upper right of your HuskyCT site. Once in Student Preview mode, an orange bar will appear at the top of the screen. What the instructor sees when in Student Preview mode is exactly what students will see in terms of content and activities. The control panel will not be visible.

PreviewUser: If the instructor elects to keep the Preview User and any data generated by the Preview User, a new student will appear in the Grade Center with the instructor’s last name followed by “_PreviewUser”. If any Tests are taken or Assignments submitted while in Student Preview mode, these would appear in the Grade Center for the PreviewUser. Entering grades for PreviewUser can be particularly helpful for determining if a calculated column is functioning properly and to see what the students see when they go to the “My Grades” tool.

Exiting Student Preview mode: Use the “Exit Preview” button at the right-hand end of the orange bar that is present during Student Preview mode. You will then need to indicate if you want to retain the Preview User and any associated data.  The default is set to “no”. If any tests were taken when in Student Preview mode and you wish to see those results in the Grade Center, you will need to keep Preview User at least temporarily. You can always re-enter Student Preview mode later and choose the option to delete the Preview User.

Collaborate Web Conferencing

Using Blackboard Collaborate

The Collaborate tool, now available in all HuskyCT sites, makes it possible for instructors to interact with students synchronously in an online web conferencing session that includes the capabilities for video, audio, screen sharing, text chat, hand-raising, file sharing, and an interactive whiteboard.  Sessions can also be recorded and available for viewing at another time. The fact that Collaborate is integrated with HuskyCT eliminates the need for sending session invites to email addresses or needing a username or password. The access from HuskyCT just requires students to click on a link to access a session.

Blogs, Journals, Wikis

Blogs

Blogs provide a place where students can post entries. They will appear in reverse chronological order. Blogs can be open to the whole class, or blogs can be created for group use.

To add or view comments, the “Comments” button below the post is used. Many instructors find the blog interface in HuskyCT to be more user-friendly and easier to navigate than the Discussion Board.

They can be set up as graded or ungraded.

Journals

Journals are essentially personal blogs. By default they are private and can just be viewed by the student and the instructor, but they can be set to be public and accessible to the whole class.

Journals can be set up as graded or ungraded.

Wikis

Wikis provide a shared space for creating and editing “pages”. They can be set up for the whole class to access or access can be limited to groups.

There is an option for grading.

Associated Help Files

Non-Class HuskyCT Sites

Associated Help Files